The first time I broke a driveshaft, I honestly thought my weekend was over. My RC truck landed what looked like a perfect jump, then suddenly it would barely move even though the motor sounded completely normal. I was already pricing replacement parts in my head, but after fixing it myself, I realized this is actually one of the easiest RC repairs you’ll ever learn.
If you’re new to working on your own RC cars, don’t let the word “drivetrain” scare you. I felt exactly the same way at first, and now replacing a driveshaft is something I can usually finish before my next battery is fully charged.
Why RC Car Driveshafts Eventually Wear Out
Every RC car has a few parts that take a beating, and driveshafts are definitely one of them. They transfer power from the transmission or differential to the wheels, which means they’re constantly under stress every time you hit the throttle.
Whether you’re blasting through loose gravel, bashing at the local park, or launching your truck off ramps, those repeated impacts eventually add up. Even high-quality steel driveshafts don’t last forever, and plastic ones usually wear even faster if you’re running a powerful brushless setup.
In my experience, waiting until a driveshaft completely snaps usually creates more work than replacing one that’s already showing signs of wear. A little preventative maintenance almost always saves money in the long run.
If you’re just getting into RC maintenance, I also recommend reading my guide on replacing RC car body clips. It’s another quick repair that every beginner ends up doing sooner or later, and it’s a good confidence builder before tackling drivetrain work.
👉 Redcat Racing Parts Guide : The Only Upgrade & Replacement Guide You’ll Ever Need

Signs Your RC Car Needs a New Driveshaft
Clicking While Accelerating
One of the first things I notice is a clicking or snapping sound whenever I squeeze the throttle.
At first I assumed it was coming from the differential, but more than once the actual problem turned out to be a worn driveshaft joint.
If your RC suddenly starts making noises it never made before, don’t ignore them. Small drivetrain problems rarely fix themselves.
Too Much Wheel Play
Lift the vehicle off the ground and gently wiggle each wheel.
A tiny amount of movement is perfectly normal.
If one wheel has noticeably more play than the others, it’s worth checking the driveshaft before tearing apart the transmission.
I’ve caught several worn shafts this way before they completely failed.
The Motor Runs, But the Car Barely Moves
This one usually gets your attention immediately.
The motor sounds healthy, the ESC responds normally, but one wheel spins while the vehicle barely crawls forward.
More often than not, the driveshaft has slipped out, broken, or lost one of its drive pins.
The good news is that it’s usually a much simpler repair than most people expect.
👉 How can I repair/replace the drive shaft?
As an Amazon Associate I earn from qualifying purchases.
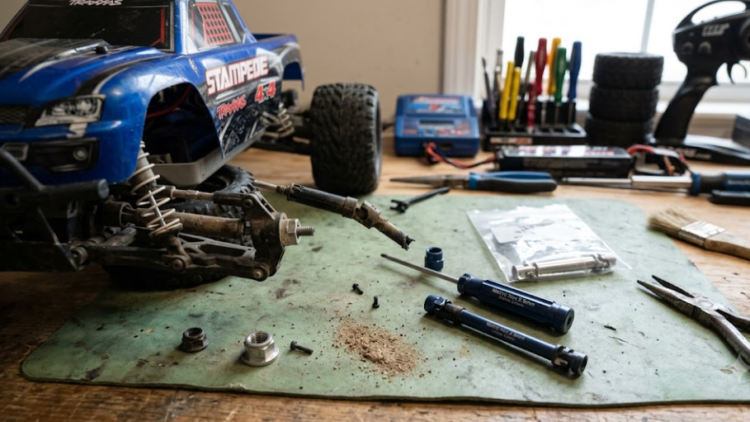
Tools You’ll Need
One reason I like this repair is that you don’t need a fancy workshop.
Most RC hobbyists already have everything required.
Basic Hex Drivers
A quality set of metric hex drivers is probably the most important tool you’ll own.
Cheap drivers can round off screw heads surprisingly fast, so this is one tool that’s worth buying once.
Needle-Nose Pliers
These make removing cross pins, retaining clips, and stubborn hardware much easier.
I keep a small pair in my pit bag because they end up getting used on almost every maintenance session.
Small Brush
Before installing any new drivetrain part, I spend a minute brushing away dirt and sand around the suspension arms and wheel hubs.
It sounds simple, but clean parts fit together better and stay that way longer.
Step-by-Step Guide to Replace RC Car Driveshafts
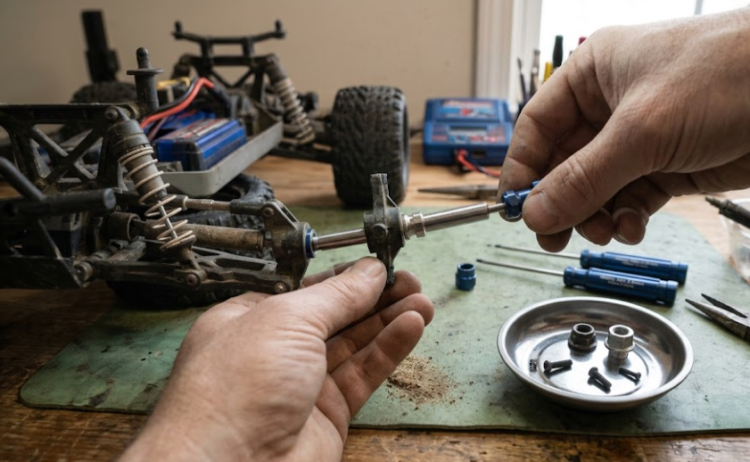
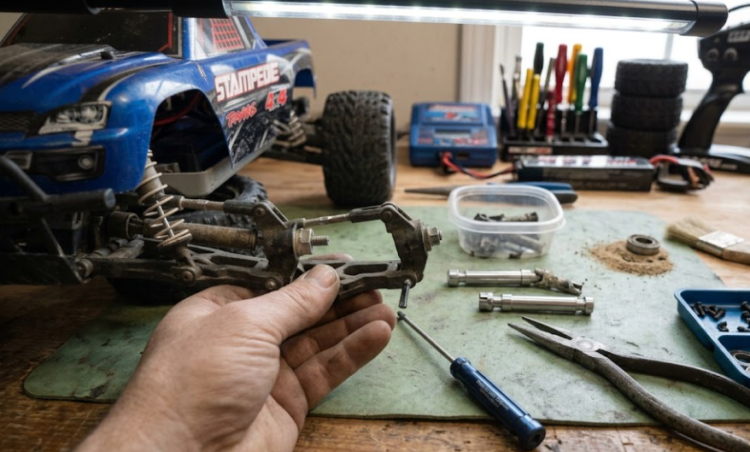
Step 1 – Remove the Wheel
Start by removing the wheel and setting the wheel nut somewhere you won’t lose it.
With the wheel out of the way, you’ll have much better access to the steering knuckle or rear hub.
Step 2 – Disconnect the Hub Assembly
Most RC cars only require removing one or two screws before the hub swings away.
As you remove hardware, keep everything organized.
Some manufacturers use different screw lengths in the same area, and mixing them up later can be surprisingly frustrating.
Step 3 – Slide Out the Old Driveshaft
Carefully remove the old driveshaft.
Sometimes it practically falls out.
Other times, dirt and dried grease make it stubborn.
Don’t force it.
If it refuses to move, rotate the suspension slightly and inspect both ends before pulling harder.
I’ve learned the hard way that patience usually saves broken parts.
Step 4 – Compare the Replacement
Before installing anything, place the old driveshaft next to the new one.
Compare the overall length.
Check the axle diameter.
Look at the drive pins and their locations.
It only takes about thirty seconds, but it can save you from putting everything back together with the wrong replacement part.
I also think this is one of the easiest mistakes to avoid, yet one of the most common.
Step 5 – Install the New Driveshaft
Slide the replacement into place and make sure both ends seat fully where they belong.
Slowly cycle the suspension through its travel while rotating the wheel.
Everything should move smoothly without binding or catching.
If something feels tight, stop and double-check the installation before continuing.
Step 6 – Reassemble and Test
Reinstall the hub assembly and tighten the screws evenly.
There’s no need to crank them down with excessive force.
Put the wheel back on, spin it by hand, and verify that everything rotates freely.
Before heading outside, give the truck a quick test on a stand using light throttle.
It’s much easier to catch a problem in the garage than halfway through your first battery pack.
A Few Extra Tips That Have Saved Me Time
One thing I’ve learned after years in the hobby is that a driveshaft rarely fails completely without giving a few warning signs first. Clicking sounds, extra wheel play, or a slight vibration under acceleration are all worth paying attention to.
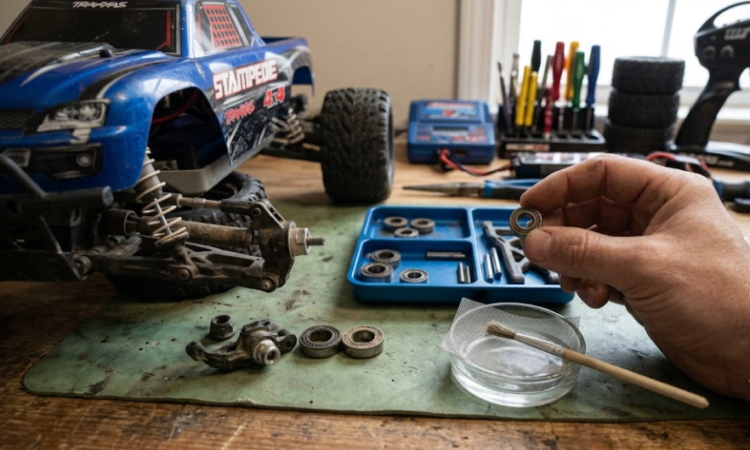
I also like checking nearby parts while everything is already apart. Wheel bearings, axle pins, and suspension arms are all easy to inspect during this repair, and replacing a worn bearing now is much easier than taking the whole corner apart again next weekend.
If you’re working through routine maintenance, another guide worth bookmarking is my article on cleaning RC car bearings. Dirty bearings often create symptoms that feel similar to drivetrain problems, so it’s a helpful repair to learn alongside driveshaft replacement.
👉 https://trvbaby.net/rc-car/rc-maintenance-fix/how-to-clean-an-rc-car-properly-after-use/
Replacing a driveshaft sounds like a major repair the first time you hear about it, but it really isn’t. Once you’ve done it once, you’ll probably wonder why you ever hesitated.
I still remember being nervous before my first replacement, and now it’s one of those jobs I can finish in less time than it takes to charge a battery. In my opinion, learning basic repairs like this is part of what makes the RC hobby so rewarding. The more maintenance you can handle yourself, the more time you’ll spend driving—and a lot less time waiting for someone else to fix your car.
Common Mistakes That Shorten Driveshaft Life
Ignoring Bent Suspension Parts
Many people replace the driveshaft but overlook slightly bent suspension arms.
Misalignment puts unnecessary stress on the new shaft.
Always inspect surrounding components.
Mixing Different Aftermarket Parts
Not every aftermarket driveshaft is built to identical dimensions.
Using mismatched components may create vibration or binding.
Whenever possible, stick with compatible upgrade systems.
Driving Without Maintenance
Dust, sand, and small rocks gradually wear drivetrain parts.
A quick cleaning after each outing dramatically increases component life.
I know cleaning isn’t the exciting part of the hobby, but my own cars always last longer when I spend five extra minutes wiping everything down.
Should You Upgrade Instead of Replacing?
Many beginners immediately buy aluminum upgrades after breaking their first driveshaft.
Sometimes that’s the right choice.
Sometimes it isn’t.
Plastic driveshafts often absorb impacts better during crashes.
Metal versions usually improve durability under higher power but can transfer stress to more expensive drivetrain parts.
For backyard driving, stock replacements are often perfectly adequate.
If you’ve upgraded to brushless power or larger batteries, stronger aftermarket driveshafts become much more worthwhile.
Prevent Future Driveshaft Problems
One lesson I’ve learned over the years is that smooth driving is usually faster than constantly crashing at full throttle.
Checking wheel bearings regularly, keeping suspension moving freely, and replacing worn parts early all help prevent unexpected failures.
I also think performing quick inspections before every run saves both money and frustration later.
If you’re interested in making your RC vehicle more reliable overall, you may also enjoy my guide covering the beginner-friendly RC rally cars that hold up surprisingly well on rough terrain.
Replacing RC car driveshafts sounds like a major repair when you first hear about it, but it’s actually one of the most beginner-friendly maintenance jobs you’ll ever do.
The first replacement may take half an hour.
The second might take fifteen minutes.
Eventually, you’ll probably finish the entire job faster than charging your battery.
I also believe every RC hobbyist should learn this repair because it builds confidence, saves money, and keeps you on the track instead of waiting for someone else to fix your car. Once you’ve replaced your first driveshaft successfully, many other RC maintenance tasks suddenly feel much less intimidating.